Introduction
Agility is a 'Members-only' skill, it allows you to gracefully swing across rope swings, scramble over rock slides, squeeze through pipes and more; using agility you can access secret areas or make use of shortcuts. Another major benefit of agility is that it affects your energy level - see the Getting around Guide.
To train this skill there are many different obstacle courses where you repeat laps around the course to gain agility xp. Each individual obstacle gives a certain amount of xp, and by going through the obstacles in the correct order you gain a bonus amount of xp. Each of the four courses is explained below, following that you can learn about the Agility Arena, the Agility Dungeon, the various shortcuts and other aspects of agility.
There are 10 courses for you to train agility:
- Gnome Stronghold Course: Level 1
- Brimhaven Agility Arena: Level 1 *
- Skullball game: Level 25
- Agility Pyramid: Level 30
- Penguin Course: Level 30
- Barbarian Outpost Course: Level 35
- Yanille Dungeon: Level 42 **
- Ape Atoll Course: Level 48
- Wilderness Course: Level 52
- Werewolf Course: Level 60
- Dorgesh-Kaan Course: Level 70
*While there is no requirement for the Brimhaven agility arena, most obstacles require at least level 20, and you must have level 40 in order to use all of them.
**Yanille dungeon requires increasing agility levels to penetrate deeper into the area.
Note also that you can use boosters to be able to cross obstacles or enter courses which require 3 to 5 levels higher than your agility level. See the boosters section of this guide.
Return to Top
Gnome Stronghold Course
Located north-west of Ardougne in the Gnome Stronghold, this is where you will have to start. Around the course you will see Gnome trainers ready to help you out and encourage you.
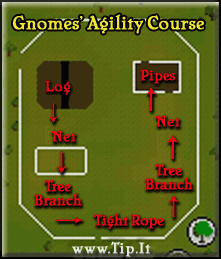
Move through the course in the order explained below:
- Slowly walk across the tree branch to start the course.
- Climb up the net to end up in the tree.
- Climb up the tree branch to the next level of the tree.
- Balance on the tight rope to get to across.
- Climb down the tree branch to get back to the ground.
- Climb over this net.
- Crawl through these pipes to end up on the other side.
Congratulations on completing a lap! Here's the xp you gain.
| Gnome Stronghold Course | |||
| Obstacle | Exp. gained | ||
| Log | 7.5 | ||
| First Net | 7.5 | ||
| First Tree Branch | 5.0 | ||
| Tight Rope | 7.5 | ||
| Second Tree Branch | 5.0 | ||
| Second Net | 7.5 | ||
| Pipes | 7.5 | ||
| Lap Bonus | 39 | ||
| Completed Lap | 86.5 | ||
Return to Top
Barbarian Outpost Course
Located due north-east from the Gnome Stronghold and due north from Baxtorian Falls. You can also use a Games Necklace to teleport to a spot right near the course. To gain entrance to the outpost you must complete the Alfred Grimhand Barcrawl. To enter the agility course itself, you must squeeze through the pipe, this requires level 35 agility.
The crucial difference between this course and the Gnome Stronghold Course is that you can lose hitpoints if you fall on the spikes or into the pond. You only lose a small amount and it depends on your maximum hitpoints so you'll never get killed. However it is a good idea to bring food with you as a failsafe.

Move through the course in the order explained below:
- Swing over the spikes via the rope swing (Watch out for the spikes).
- Balance across the log to get over the pond.
- Climb the net to enter this building.
- Balance across the ledge over the spikes (Watch the spikes again).
- Now hurdle over each of the three crumbling walls.
Congratulations on completing a lap! Here's the xp you gain.
| Barbarian Outpost Course | |||
| Obstacle | Exp. gained | ||
| Pipe | 10.0 | ||
| Rope Swing | 22.0 | ||
| Log | 13.7 | ||
| Net | 8.2 | ||
| Ledge | 22.0 | ||
| Crumbling wall (each) | 13.7 | ||
| Lap Bonus | 46 | ||
| Completed Lap | 153 | ||
Return to Top
Agility Pyramid
Requiring level 30 to enter, this course is located due east of the crocodile pond in the deep southern part of the desert. You can get there quickly by taking a magic carpet to Pollnivneach, go south to the other carpet station, and take another carpet to Sophanem, then head north-east.
You should bring food and waterskins, as you can take damage from obstacles and will be outside in the desert heat while doing this course.

Talk to Simon Templeton, then enter the pyramid from the south-west corner, and make your way to the top. During the trip you must:
- Jump across rotating stones that move from under your feet
- Climb low walls blocking your path.
- Jump across gaps left from decayed stones.
- Cross planks that have been placed over gaps too large to jump across.
- Avoid mobile sections of the stone walls that try to knock you off the pyramid.
- Cross ledges of remaining stone.
- Take the golden pyramid before going back down to the pyramid's base.
You should sell the pyramid to Simon right away, because it weighs nearly 12 kg. Note that if you fall and do not complete the two traps after the pyramid, a new pyramid will not spawn when you exit using the door.
Congratulations on completing the pyramid! Here's the xp you gain for each obstacle you face (most you face several times).
| Agility Pyramid | |||
| Obstacle | Exp. gained | ||
| Rolling Block | 12 | ||
| Low Wall | 8 | ||
| Ledge | 52 | ||
| Sliding Block | 0 | ||
| Plank | 56.4 | ||
| Rolling Block | 12 | ||
| Cross Gap | 56.4 | ||
| Ledge | 52 | ||
| Stairs to Level 2 | 0 | ||
| Cross Gap | 56.4 | ||
| Jump Gap | 22 | ||
| Cross Gap | 56.4 | ||
| Rolling Block | 12 | ||
| Ledge | 52 | ||
| Low Wall | 8 | ||
| Jump Gap | 22 | ||
| Stairs to Level 3 | 0 | ||
| Low Wall | 8 | ||
| Ledge | 52 | ||
| Sliding Block | 0 | ||
| Jump Gap | 22 | ||
| Cross Plank | 56.4 | ||
| Stairs to Level 4 | 0 | ||
| Jump Gap | 22 | ||
| Rolling Block | 12 | ||
| Jump Gap | 22 | ||
| Low Wall | 8 | ||
| Stairs to Level 5 | 0 | ||
| Climbing Rocks | Artifact worth 1,000gp | ||
| Rolling Block | 12 | ||
| Jump Gap | 22 | ||
| Exit to Bottom | 300 | ||
| Completed Lap | 1,014 Agility XP (if you don't fail anything) and 1,000 gold coins (upon giving golden pyramid to Simon) | ||
Return to Top
Penguin Course
With level 30 agility you can gain access to this course during the Cold War quest. After completion of the quest, you will need to make another penguin suit on a Crafting table 3 in a POH Workshop with a plank, silk, and clockwork(1 steel bar).
The course is located in the penguin's outpost, on the iceberg, in the Lunar Sea. There are several ways to get to the iceberg; the quickest option is to fairy ring teleport just east of the boat using code DKS, or you can teleport to Rellekka using an enchanted lyre or house teleport (if your house is in Rellekka) then walk northeast to the boat.
You should bring a penguin suit and plenty of food since there is no bank nearby and the nearest fishing spots are in Rellekka. Once you get to the Iceberg speak with Larry for the shrinking spell. Remember you cannot have any weapons, shield or cape equipped.

Move through the course in the order explained below:
- Get into the water and swim past the crusher icebergs.
- Climb onto the first stepping stone and jump each one to the shore.
- Tread-softly across the icicles.
- Walk along the ice slope.
- Slide down the hill.
- Exit through the gate.
Congratulations on completing a lap! Here's the xp you gain.
| Penguin Course | |||
| Obstacle | Exp. gained | ||
| Crushers | 55 | ||
| Stepping Stones | 80 | ||
| Icicles | 40 (x4) | ||
| Ice Slope | 180 | ||
| Ramp Jumps | 0 | ||
| Lap Bonus | 65 | ||
| Completed Lap | 540 | ||

Return to Top
Ape Atoll Course

The 3 requirements to access this course are to have an agility level of 48, to have completed the Monkey Madness quest and have a Ninja Greegree.
To make the ninja greegree, you need to kill an Archer Monkey to get ninja bones. Buy a monkey talisman for 1,000 gold from Tutab’s Magical Market and visit Zooknock, as usual, to have the greegree made.
You must use the Ninja Greegee to turn into a ninja monkey before attempting to use this course, otherwise you will not even be allowed in.
This course is fairly fast, provides better experience per lap than the Wilderness course and no need to worry about PKers either! Next to the building, at the end of the course, there is a pineapple plant, fishing spot and trees you can chop. So equipped with either a knife or the combination of big net or harpoon (for sharks), axe and tinderbox you can obtain food to heal any damage inflicted.
Note: It is not possible to fish while wearing your monkey disguise, so if you plan to do this it is advisable to also carry an anti-poison potion.
Players report that the chance of failing any of the obstacles is significantly reduced at agility levels over 70, and drops to zero (no failures) after level 75.
In this course you must:
- Jump over stepping stones.
- Climb up the tropical tree.
- Swing across monkeybars.
- Climb up skull slope.
- Swing on the rope swing
- Climb down the tropical tree.
Congratulations for completing the lap! Here's the experience you gained:
| Monkey Agility Course | |||
| Obstacle | Exp. gained | ||
| Stepping Stones | 40 | ||
| First Tropical Tree | 40 | ||
| Monkey bars | 40 | ||
| Skull Slope | 60 | ||
| Rope | 100 | ||
| Second Tropical Tree | 300 | ||
| Lap Bonus | 0 | ||
| Completed Lap | 580 | ||
If you have started Awowogei: A Giant filled snake, you can get monkey nuts to heal 5 hp from the bush located on the course (just go down the ladder). You need to keep dropping or eating them in order to pick more from the bush. Once you have completed the sub-quest you can no longer pick from this bush.
Note that there is no lap bonus on this course. The bulk of the lap experience (300 xp) is on the last obstacle, the second tree where you come down the vine. Unfortunately, if you fail this one, there is no way to redo it, so you miss out on a large chunk of xp that round.
Return to Top
Wilderness Course
This course is located deep in the members' area of the Wilderness, from level 52-55. You will need Level 52 agility to cross the ridge and gain access to the course. If you use an Agility Potion to enter, you will be able to cross the obstacles at your natural level, just not the entrance. Doing this, there is a possibility that you will slip into a pit of White Wolves. Beware, often there will be player killers preying on the course, so taking the risk is up to you. The reward equals the risk however, and there is plenty of xp to be gained.
Like the Barbarian Outpost Course, you are at risk from failing obstacles. If you fall into the spike pit, you will have to dodge the skeletons and make a dash for the ladder. If you want to navigate the course be sure to bring along a stock of food. Do not forget about the player killers! Decide whether to wear good armour and defend yourself using weapons and potions, or simply bring as few valuables as possible to minimise PK losses.

Move through the course in the order explained below:
- Crawl through the pipe.
- Swing over the spikes using the Rope Swing (may fall into the spikes).
- Traverse the lava by walking over the stepping stones (could fall into the lava).
- Balance over this pit by walking across the log (could fall into spike pit).
- Now walk past some skeletons and climb up the rocks to finish.
Congratulations on completing a lap! Here's the xp you gain.
| Wilderness Agility Course | |||
| Obstacle | Exp. gained | ||
| Ridge (This is not counted as part of the course.) | 15.0 | ||
| Pipe | 12.5 | ||
| Rope Swing | 20.0 | ||
| Stepping Stones | 20.0 | ||
| Log | 20.0 | ||
| Rocks | 0 | ||
| Lap Bonus | 498.9 | ||
| Completed Lap | 571.4 | ||
Return to Top
Werewolf Agility Dungeon
This arena is located in Morytania. The entrance is in the haunted woods east of Canifis (west of Port Phasmatys). You will need to wear the Ring of Charos and have level 25 agility to enter. You can get this ring only after completing the Creature of Fenkenstrain quest.
The dungeon is split into two different areas:
- The Skullball course, on the east side of the dungeon requires an agility level of 25.
- The Werewolf agility course, on the west side of the dungeon requires an agility level of 60.
SKULLBALL COURSE
To play a game of skullball you need to talk to the Skullball boss at the start of the course. This is actually kind of a mini game, for fun. At a higher level this game is not as time efficient for training as other courses. At a lower level it can be quite a quick way of gaining experience.
Simply put, you have to kick a skull through the legs of dummy skeleton goalkeepers, hanging in goals around the course. You need to travel around the course in a clockwise direction, scoring through 10 goals along the way. To complete the lap you kick the ball into a hole in the wall. The faster you go around the course, the more agility xp you receive, up to a maximum of 750 xp per lap. With practice, it can be done quickly in around 2:30 to 3:00 minutes. As long as your time is below 4:00 minutes (not difficult to do), you should earn the full 750 xp.
At lower levels this is quite a good place to train your Agility. There are no obstacles to fail, nothing to attack you (apart from the Lvl 52 leeches on the way to the arena), and 750 xp per circuit soon adds up. Even if you do take slightly over the 4:00 mins per lap you will receive exp, though it will be reduced.
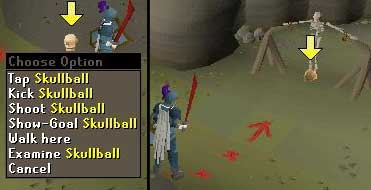
The skull has to be passed through 10 goals and finally kicked into a hole in the wall in order to complete the lap. If you right click on the skull you are presented with a number of options. These are:
- Tap skullball - moves the skull 1 space.
- Kick skullball - moves the skull 5 spaces.
- Shoot skullball - moves the skull 10 spaces.
- Show-goal skullball - causes an arrow to light up above the goal you should be aiming for.
Kicking the skull through a goal or rebounding it off a wall reduces the distance it travels by one space.
As you run around the course the trainers will shout 'encouragement' and pass comment on your performance.
WEREWOLF COURSE
To use the Werewolf agility course you need an agility of 60 or higher. When you start a lap, the wolf agility trainer will throw a stick for you to fetch on the other side of the pipes. During your lap, you need to pick the stick up. At the end of the course you have to hand over the stick to get the bonus xp for a complete lap.
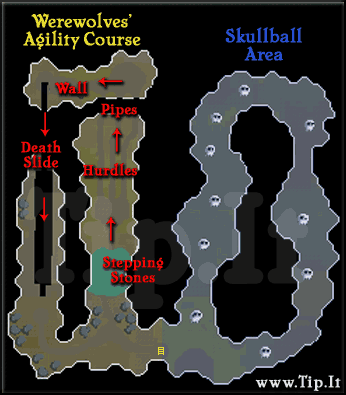
Move through the course in the order explained below:
- Jump across the five stepping stones.
- Jump over three hurdles.
- Squeeze through one of the pipes.
- The stick will be around here don't forget to pick it up.
- Climb up the skull wall.
- Take zip line all the way down.
- Hand over your stick to the wolf to finish.
Congratulations on completing a whole lap! Be aware that you can fall off the death slide and be hit for damage to your health. It can hit up to 30 and will kill you if you don't have enough hit points. The wolves warn you that the more weight you are carrying, the more likely you will fall. Here's how the xp works for this course.
| Werewolves' Agility Course | |||
| Obstacle | Exp. gained | ||
| Stepping stones | 10 (x5) | ||
| Hurdle | 20 (x3) | ||
| Pipe | 15 | ||
| Wall | 25 | ||
| Death Slide | 200 | ||
| Lap Bonus (turn in stick) | 190 | ||
| Completed Lap | 540 | ||

Note: In order to get the lap bonus, you must remember to pick up the stick and return it to the wolf agility trainer.
Return to Top
Dorgesh-Kaan Agility Course
The Dorgesh-Kaan Agility course, the most high-level and hardest Agility course in the game, is located at the southern end of Dorgesh-Kaan. (To have access to Dorgesh-Kaan and the Agility course, you must have completed the Death to the Dorgeshuun quest.)
To use the Dorgesh-Kaan course, you need level 70 Agility. To complete a large majority of the course, you will also need 70 Ranged, a mithril grapple and crossbow. (See Mithril Grapple Shortcuts to learn about this item.) Finally, you will need to bring along a source of light.
To start the course, head up the southern staircase in Dorgesh-Kaan. Once there, if you want to complete a small mini-game within the course that gives bonus xp, head to the northeast corner and speak with Turgall. Turgall will ask you to bring him some parts for the generator. Once you bring him the parts, a varying bonus will be given to you, dependent upon which way you went to obtain the requested item.
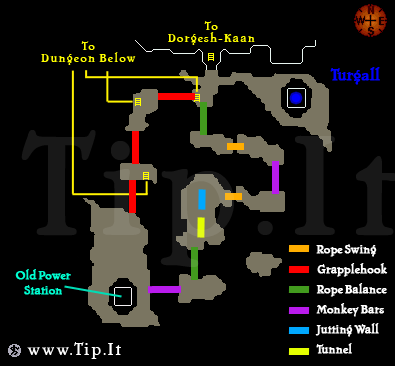
The following is a table showing restrictions on Turgall's requests.
| Turgall's Requests | |
| Heavy No Grappling |
Fragile No Tunnels |
| Cog Lever Powerbox |
Capacitor Fuse Meter |
NOTE: Heavy objects are found in the Boiler and fragile objects are found in the Console. Both of these areas can be found near the southwest generator, also known as the "Old Generator".
The following is a table showing the relationship between the obstacle and the experience you receive for completing it:
| Dorgesh-Kaan Agility Course | |
| Obstacle | Experience Gained |
| Grapple Platform | 18 Agility 18 Ranged and 18 Strength |
| Tight Rope | 25 Agility |
| Cable Swing | 22 Agility |
| Swinging Ladder | 25 Agility |
| Gap Squeeze | 7.5 Agility |
| Tunnel | 7.5 Agility |
| Complete Lap (No Grapple) |
159 Agility |
| Complete Lap (With Grapple) |
54 Agility 54 Ranged and 54 Strength |
| Lap Bonus (No Grapple) |
1,216 Agility |
| Lap Bonus (With Grapple) |
571 Ranged |
NOTE: Grapple/No Grapple bonuses are based on how many times you use the grapple during the course.
Return to Top
Brimhaven Agility Arena
Cap'n Izzy No-Beard in the bamboo hut in the north-east corner of Brimhaven (located on Karamja Island) has discovered ancient ruins underground where a cavern of platforms exist. A 200gp entry fee is required to enter. Here you can have fun training your agility and gaining tickets by competing against the clock! The aim of the game is to make your way across the agility obstacles between the 25 platforms to the one with the flashing arrow, and tag the pillar there to receive a ticket. Each minute the flashing arrow changes to a different random platfom. A map of the arena identifying the obstacles between platforms is shown below.
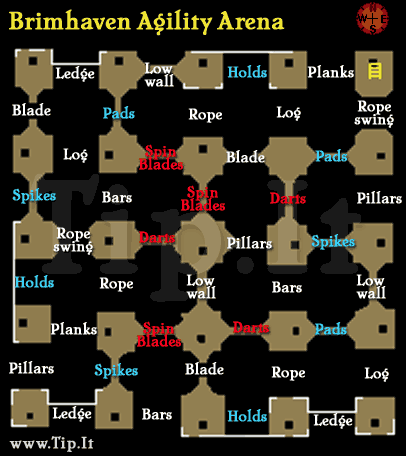
- White obstacles only require level 1 agility to cross.
- Blue obstacles require lvl 20 agility to cross.
- Red obstacles require lvl 40 agility to cross.
| Alternatively, click here to launch an interactive Agility Arena Map (pop-up) |
Each obstacle gives a different amount of xp. It is worth noting that when crossing the planks, only one will get you across. Look carefully to find the non-crooked one, because they change. Also, when you fail darts you will temporarily lose 2 or 3 agility levels, so check before attempting hard obstacles if you are near 40.
| Brimhaven Agility Arena | |||
| Obstacle | Exp. gained | ||
| Ledge | 16 | ||
| Hand Holds | 22 | ||
| Blade | 0 | ||
| Spinning Blades | 28 | ||
| Darts | 30 | ||
| Rope Balance | 10 | ||
| Ropeswing | 20 | ||
| Floor Spikes | 24 | ||
| Pressure Pads | 26 | ||
| Monkey Bars | 14 | ||
| Pillars | 18 | ||
| Low Wall | 8 | ||
| Log Balance | 12 | ||
| Planks | 6 | ||
The best way to train here is to carry as little weight as possible, that way your running energy will last longer. Keep your hit points below 20 to reduce the damage taken when failing obstacles, so you can stay longer.
You will not receive a ticket for the first pillar you tag, but for every one in a row thereafter. If you miss a pillar then you will miss out on the next ticket so try to keep your rhythm going. You can save up these tickets to trade them with Pirate Jackie the Fruit for various rewards as detailed below. She is in the same hut where you paid to enter the arena.
| Rewards you can trade your tickets for | ||||
| No. of tickets | Reward | Total | ||
| 1 | 240xp | 240 xp | ||
| 10 | 248xp each | 2,480 xp | ||
| 25 | 260xp each | 6,500 xp | ||
| 100 | 280xp each | 28,000 xp | ||
| 800 | Pirate's hook | - | ||
| 1000 | 320xp each | 320,000 xp | ||
| 3 | Toadflax (herb) | - | ||
| 10 | Snapdragon (herb) | - | ||
Wearing the Karamja gloves 2 (reward from completing the Medium level of the Karamja Achievements Diary) (or Karamja gloves 3) when you redeem your tickets will earn 10% more reward xp. So, one ticket gives 260 xp instead of 240 xp, etc.
Return to Top
Agility Dungeon
There is a dungeon located just north of Yanille known as the Agility Dungeon where you can use your agility to access different areas. Below are the details of the different obstacles you can overcome. Again, you can fail some obstacles and fall into a lower dungeon, but this one has poison spiders so bring an anti-poison potion if you want to explore here.
| Agility Dungeon Obstacles | |||
| Obstacle | Level Required | Exp. gained | |
| Ledge | 42 | 22.5 | |
| Pipe | 49 | 7.5 | |
| Monkey Bars | 57 | 20.0 | |
| Pile of Rubble | 67 | 5.5 | |
Return to Top
Shortcuts
There are quite a few places through out the world where you can make use of your agility level to overcome obstacles and use certain Gnome Shortcuts to save walking time. Several quests require certain agility levels to be able to finish. Many dungeons also restrict areas, or have shortcuts, for certain agility levels. Details of these are shown in the table below. They are also indicated on the world map as well as the appropriate dungeon maps by this icon: ![]()
| Agility Shortcuts | |||
| Level | Obstacle | Location | Info |
| 5 | Crumbling Wall | Falador West | This connects the south of Taverly to the west of Falador. People mining at Taverly or buying herblore supplies in Falador can have quick access to the Falador bank amongst other things. |
| 10 | Rope Swing | Karamja West | This allows you access a small island with Moss Giant respawns which you couldn't get to otherwise. |
| 12 | Stepping Stones | Brimhaven Dungeon | This allows you to venture deeper into this dungeon. |
| 15 | Monkey Bars | Edgeville Dungeon | This allows you to venture deeper into this dungeon to access some Earth Warrior respawns. |
| 16 | Underwall Tunnel | Yanille | Crosses the north boundary of Yanille. |
| 20 | Log Balance | Coal Trucks | Connects the Coal Trucks towards Mcgrubbors wood. Miners can use it to get to Seer's Village quickly. |
| 21 | Underwall Tunnel | Varrock | Link between Varrock palace to the Forest north of Varrock. |
| 22 | Pipe Squeeze | Brimhaven Dungeon | This allows you to venture deeper into this dungeon. |
| 26 | Underwall Tunnel | Falador South | Crosses the south Falador boundary. People mining at the Crafting guild can use it to access the bank more easily. |
| 30 | Stepping Stones | Brimhaven Dungeon | This allows you to venture deeper into this dungeon. |
| 31 | Stepping Stones | Draynor Manor | Between Draynor Manor and near the Champion's Guild across the river. |
| 33 | Log Balance | Ardougne | Cross the river through Ardougne from near the North bank. |
| 34 | Pipe Squeeze | Brimhaven Dungeon | This allows you to venture deeper into this dungeon. |
| 37 | Rock Climb | Gnome Stronghold | Links the Barbarian outpost to the Grand Tree Area in the Gnome Stronghold. |
| 38 | Cliff Side Scramble | Al-Kharid | Allows you to get out of the Al-Kharid mine quickly. |
| 41 | Cliff Side Scramble - Easy | Trollheim | Shortcut in the Trollheim areas. |
| 42 | Narrow Crevice | Dwarven Mine | Links between one side of the Dwarven Mine to the other. |
| 43 | Cliff Side Scramble - Medium | Trollheim | Shortcut in the Trollheim areas. |
| 44 | Cliff Side Scramble - Advanced | Trollheim | Shortcut in the Trollheim areas. |
| 45 | Log balance | Elven Lands | A shortcut over the river. |
| 46 | Narrow Walkway - Medium | Lost City | Shortcut towards the cosmic runecrafting altar in the Lost city. |
| 47 | Cliffside Scramble - Hard | Trollheim | Shortcut in the Trollheim areas. |
| 48 | Log Balance | Fremennik Province | Balance over the river from Sinclair's mansion to the Fremennik Province. Can be used to get to the Slayer dungeon and Keldagrim more quickly. |
| 51 | Pipe Squeeze | Edgeville Dungeon - Varrock Sewers | A link between the west of Edgeville Dungeon to the north-east of Varrock Sewers. |
| 58 | Weathered Wall | Port Phasmatys - Ectopool | Use this for quicker trips when you're using the Ectofunctus for your bones. |
| 59 | Cliffside Scramble - Easy | Elven Lands | Cut across the path in Arandar towards the Elven lands. |
| 61 | Spiked Chain Climb | Slayer Tower | From the Ground floor to the first floor of the Slayer tower. |
| 62 | Narrow Crevice | Slayer Dungeon | Shortcut from the Basiliks to the Turoths towards the end of the slayer dungeon. |
| 64 | Climb | Trollheim Wilderness Route | Leads from Trollheim into the wilderness, no path back. |
| 65 | Ornate Railing | Temple on the Salve | Can be used after completing the Priest in Peril quest, avoids going through the Temple dungeon to get to Morytania. |
| 66 | Narrow Walkway - Advanced | Lost City | Shortcut towards the cosmic runecrafting altar in the Lost city. |
| 68 | Cliffside Scramble - Medium | Elven Lands | Cut across the path in Arandar towrads the Elven lands. |
| 70 | Pipe Squeeze | Members' Dungeon | Quick access to the Blue Dragon's Den from the entrance of the Member's dungeon. |
| 71 | Spiked Chain Climb | Slayer Tower | From the first floor to the second floor of the slayer tower. |
| 80 | Spiked Blades Jump | Members' Dungeon | Quick access to the west side of the members dungeon from its entrance. |
| 81 | Spiked Blades Jump | Slayer Dungeon | Avoid the long winding path and get straight to the Pyrefiends in the Slayer dungeon once you've entered. |
| 85 | Cliffside Scramble - Advanced | Elven Lands | Cut across the path in Arandar towards the Elven lands. |
Return to Top
Mithril Grapple Shortcuts
These shortcuts appear on the in game popup guides for the Agility, Strength and Range Skills. In order to use them you will need to have the necessary skill levels, as well as the following equipment:
- A crossbow
- A mithril grapple (aka. mithril grapple tipped bolt with rope attached)
Details of making the mith grapple tip can be found in the Smithing Guide and the bolts and crossbows in the Fletching Guide.
In order to prepare a mithril grapple for use you need the following items:
| Mith grapple tip | |
| Mithril bolt | |
| Some rope |
Using the mith grapple tip on a bolt you create a ![]() Mithril grapple tipped bolt.
Mithril grapple tipped bolt.
Then use this on the rope to create a ![]() mithril grapple. To be able to do this, you must have 59 fletching.
mithril grapple. To be able to do this, you must have 59 fletching.
To use the mithril grapple shortcuts, both the crossbow and mithril grapple need to be equipped. Only one mithril grapple can be carried in your arrow spot.
Note: There is a chance that a mithril grapple can break in use, so it is advisable to carry a spare if you wish to return via the same route.
So having got your crossbow and made a couple of mithril grapples it is time to set off on a voyage of discovery, around the lands of Runescape, to find out where to make use of your new equipment.
Details of these shortcuts are shown in the table below. They are also indicated on the world map by this icon: ![]()
| Shortcuts using mithril grapples | ||||
| Agility Lvl | Strength Lvl | Range Lvl | Description | Location |
| 8 | 19 | 37 | Cross River Lum to Al Kharid | Between the east of Lumbridge Swamp and Al Kharid |
| Using this shortcut you can cross between Lumbridge and Al Kharid. This provides a quick route to recharge prayer or to ferry ores between the mine and the bank or forge. The crossing can be used either way. This is a 2 stage crossing utilising the raft island between the two spots. | ||||
| 11 | 37 | 19 | Scale Falador Wall | North-east Falador, just east of the park |
| You use the mithril grapple to scale up one side of the wall, then jump down on the other side. It's a quick route between the Falador East bank and the Barbarian village and Monastery. This shortcut can be used both ways. | ||||
| 32 | 35 | 35 | Scale Catherby Cliff | To the east of Catherby, near the fruit tree patch and rockslide |
| Using this shortcut you can take a quick trip over to Taverly, without having to go over White Wolf Mountain or through the Dwarven pass. You have to shoot the mithril grapple at a rock at the top of the cliff. This shortcut is one way only, from Catherby to the top of the cliff.
Note: You also need to have completed the Fishing Contest quest to use this shortcut. |
||||
| 36 | 22 | 39 | Escape from Water Obelisk Island | Water Obelisk, above the Black Dragons in Members' Dungeon |
| Have you just battled past the Black Dragons to enchant a few water or fire orbs? Perhaps you made a quick exit up the ladder to escape their fiery breath? Bored with just standing on the island, waving at the fishers, doing seal impressions in the hope they will throw you a fish? Well this shortcut is for you! It allows you cross from Water Obelisk island over to Catherby. You need to shoot your grapple at the crossbow tree, then cross over and join the people fishing, accept their general awe, applause and perhaps a fish or two. This shortcut is one way only. | ||||
| 39 | 38 | 21 | Scale Yanille Wall | South Yanille, behind the Dragon Inn |
| Using this shortcut provides you with a quick route between Yanille / Wizards' Guild and Gu'Tanoth / Feldip Hills. You use the mithril grapple to scale the wall, then jump down the other side. This shortcut can be utilised in either direction. | ||||
| 53 | 21 | 42 | Karamja Crossing | South-east of the Karamja Volcano, west of the shop |
| This shortcut is a quick means of crossing from the banana plantation south-east of Karamja volcano (near where the Amulet of Glory Karamja teleport takes you) to the peninsula near the Harpie Bug swarms. The crossing can be used either way. This is a 2 stage crossing utilising the small island between the two spots. | ||||
Return to Top
Agility Boosters
There are two ways to boost agility: an Agility Potion or Summer Pie. Agility potions are made with the herblore skill by mixing a toadflax herb and some toad legs. Yes, the same toadflax you can get by exchanging tickets at the Brimhaven arena, or grow using the farming skill. Agility potions are very handy. They temporarily raise your agility level by 3. This allows you to take various obstacles and shortcuts that are up to 3 levels away! The summer pie is made from farmed ingredients using the cooking skill, and temporarily raises your agility by 5. Your agility will be drained back to normal at the same rate that any other stat is drained after drinking stat boosting potions/beers.
Here is a list with some of the most frequent uses of agility boosters:
- Do several quests such as Regicide.
- Enter the wilderness agility course at level 49 (you only need 52 to pass the ice "bridge").
- Take several high level shortcuts.
- Cross the "pile of rubble" in the Yanille agility dungeon to fight Salarin the Twisted. He sometimes drops the Sinister key for the Sinister chest, which contains a series of herbs.
Return to Top
Training
Start training at the Gnome Stronghold course. When you get to level 35 you can use the Barbarian Outpost course, but you will fall often. It's recommended to go to the Outpost at level 40. Use this course until you get level 52 and can then use the wilderness course thereafter for best xp, if you are willing to take the PK risk. Alternatively use the Werewolves' course from level 60 or 65 which is arguably the same speed and without the risk, but needs more food. You could also have fun training in the Agility Arena after level 40 agility so you can have full access to all platforms, but it is less xp per hour so you'll be training for a longer period of time. Some say that for any level past 48, the Ape Atoll course is fastest and safest of all the courses.
Playing Gnomeball in the Gnome Stronghold also gives some minor Agility XP as well as ranged. Chasing a wind-up toy mouse (made by crafting) earns 15 xp for each attempt. Playing the Rogues' Den maze mini game gives some agility xp, depending on how far you get.
Agility is important to your overall game experience because it affects your Energy. When you are not running, you recover your energy back. So this means while you are standing or walking, you recover energy. The higher your agility the faster this happens - and this effect is carried over to f2p servers as well.
While training your agility, it is advisable to keep your weight as low as possible. Not only will you be able to run longer, without running out of energy, but you also stand a greater chance of not failing obstacles.
The Boots of Lightness, obtained at the start of the Temple of Ikov quest, can be extremely helpful here as they reduce your weight by 4kg.
Members with the necessary hunter level can wear one of two capes to further reduce their weight. These capes are made from furs obtained through Falconry. Spotted capes reduce the wearer's weight by 2-3 kg and require a Hunter level of 40. Spottier capes reduce weight by 4-5 kg and require a Hunter level of 66. See the clothing section in the Hunter guide for details.
Players who have the necessary points playing the Barbarian Assault Mini game can purchase a set of Penance Gloves that reduce their weight by 4-5 kg.
Return to Top
Cape of Achievement
Once you have mastered the skill and reached level 99 you may want to buy an Agility Cape from Cap'n Izzy No-Beard on Brimhaven, at the start of the Agility Arena.
Refer to the Achievement Capes guide for more details.
![]()